I published the first shot to YouTube so that you can see how it came together after constructing it.

Sunday, 31 January 2016
First Shot Construction


Then I opened window > Timeline and changed the frame rates per second from the automatic 30 (for live film) to 12 (for animation).
The next task was drawing a simple tree design, adding an image layer and a video layer. Once I had drawn the tree then on the unmovable image layer I realized I had made a mistake. I wanted the tree trunk and grass to stay in place but I wanted the leaves to move, the leaves that I had already drawn on the image layer...

So i made a new layer and redrew the tree over the top of the previous image layer as I needed to clean up the lines anyway.

This was the result I was left with when I hid the first layer. Almost identical but a little cleaner cut.

I then went in frame by frame redrawing the leaves each time.

After I had about ten frames of the leaves moving, to work smart and not hard I duplicated the frames rather than redrawing them another coupe of hundred times, creating then a video layer group.


ttt
Saturday, 30 January 2016
Thursday, 28 January 2016
First Draft (2) of my Movie Poster
So here I completely changed the concept and layout of my poster to suit a more sophisticated audience.

I asked 10 of my target audience then to give me constructive feedback:
1. Needs an age rating.
2. Possibly change of font in places.
3. Needs a star rating.
4. Missing rating box.
5. Excellent composition and imagery.
6. Like the illustration, lacking colour though.
7. Very dark, try brighten it up in places.
8. Nice structure and drawing, wouldn't change it.
9. Make font bolder in places to stand out more.
10. Love it! So eye-catching!
Sunday, 24 January 2016
Change In Mind
After a little deliberation and really studying how my movie poster was turning out I decided that the whole poster was too overpoweringly green. The poster was supposed to be aimed to a more sophistocated audience, but this was looking very childish, very picture book like. It was supposed to be imagery that really stood out, was unique and eye-catching and enticed the older audience. I'm glad I realized the effect the imagery had at this early stage, it gave me the option to go back and fix it. To fix it, I simply restarted. Not an easy decision to make but I knew it would make a huge impact on my final product. And it wasn't as if I was completely restarting, I had all my important layers saved so I could re-edit them back together.

 |
|
 |
|

 |
|
 |
 
|
 |
|
 |
| (cropped out image) |
 |


|
Thursday, 21 January 2016
Movie Poster Construction
Starting to construct my movie poster, I opened Photoshop and created a base layer by laying down a dark green colour. I then selected the airbrush tool to get a smooth effect and gradually lightened the colour to a light bright green as I continued to draw circles getting smaller until I had achieved the gradient effect. I then scanned in an illustration I had previously hand drawn of a tree, took the background out and converted it to a negative image so that it was white. Changing the image size then and layering it in is how I achieved the first image, from there I opened up the poster for 'A Bugs life' and gradually tried to replicate the image. I had to zoom in with my graphics tablet to add in detail so that it wasn't just a basic drawing.


Teaser Trailer Draft 2
Here is my second draft of my teaser trailer, I have added a few shots in but it still needs a lot of work in terms of build up and music.
Tuesday, 19 January 2016
Storyboard Planning
The Storyboard is a crucial element for me in the making of my teaser trailer as my film is animation so the storyboard will have to be visually pleasing and effectively intrigue people by the visuals, more so than the storyline. Today I was working on sketching out the opening scenes composition as I will have to work out every detail that is going into my film, as I am drawing it. Here is some of the sketches, featureing the establishing shout, with references to lighing, framing, mood and atmosphere throughout. (Apologies for the bad hand writing, couldnt get my ideas onto paper fast enough)


Monday, 18 January 2016
Teaser Trailer First Draft Construction
(follow up more detail from my last post)
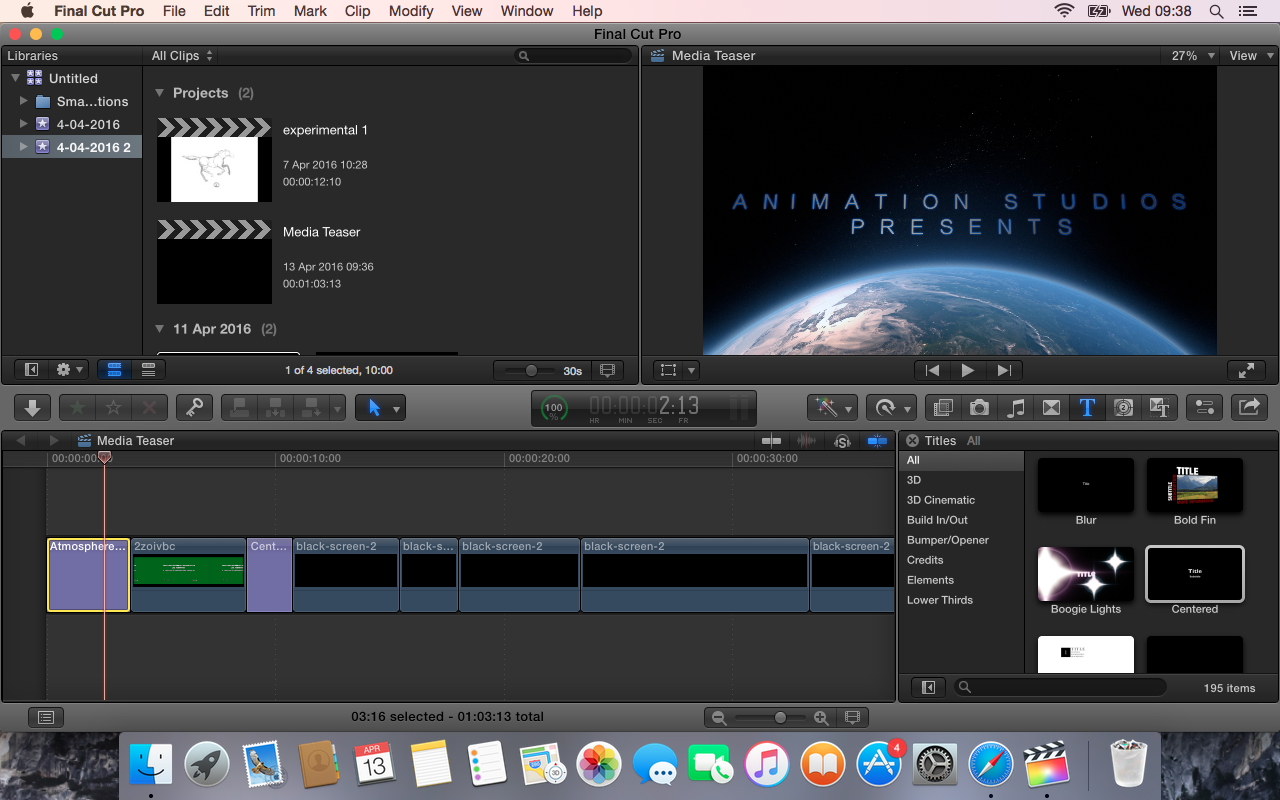
Here I have put into place the first draft of my teaser trailer using Final Cut Pro software available on the Mac Apple Laptops.
I started my trailer by opening on a shot of the production team, using a formatted effect of planet earth and the text swooping in, a lot like the UNIVERSAL film logo, making it easily recognizable to the audience as the company that produced it.

I knew that the trailer had to be timed perfectly, so I altered the time of each shot so that I could showw as much footage as possible without a lot of distractions, as my animation storyline is a bit harder to follow than your common genre.

I then added inter-titles, manipulating the font so that there was a blue haze around it, to reference back to Avatar the movie, which the characters are made in an array of blue tones.

I tried to map out my teaser trailer before editing so that everything would be easily edited if i wanted to add effects or colour filters in certain parts.

I used the cross dissolve and fade to black in between each shot so that my teasr trailer would run smoothly and effectively, not straying from the Classic Hollywood Style of unobtrusive editing so the storyline is as easy to follow as possible and the audience is not distracted by harsh dramatic cuts from shot to shot.

I chose the simple text layer that faded in and out quickly, then changed the font to manipulate it into my own style.


I tried to make sure at all points of the trailer that timing was perfect, especially the start so that the audience were drawn in and intrigued to watch more rather than glance at it and not be interested.

Fading into the cloud effect gave reference to many production company's, the most famous examples being either Dreamworks or Warner Bros. Not a direct copy as such, but a mimic all the same.


I added a stylistic looking background onto my title to give it an illustration like look.

I made sure that the text layer was placed on top to show it fading in and out.

On certain parts of my trailer I changed the saturation levels so that I could make some shots a harsher contrast between light and dark tones, which would then impact the emotive effect of the trailer.


After some shots being exported from Photoshop and acting quite slow, it was easy to speed up the frame rate using final cut pro. I customized the speed to make it perfectly how I wanted it.

When exporting, I saved the video out as a master file and then uploaded it to youtube, as the MAC laptops would not allow to publish straight to YouTube as they are restricted by school guidlines.


Here I have put into place the first draft of my teaser trailer using Final Cut Pro software available on the Mac Apple Laptops.
I started my trailer by opening on a shot of the production team, using a formatted effect of planet earth and the text swooping in, a lot like the UNIVERSAL film logo, making it easily recognizable to the audience as the company that produced it.
I knew that the trailer had to be timed perfectly, so I altered the time of each shot so that I could showw as much footage as possible without a lot of distractions, as my animation storyline is a bit harder to follow than your common genre.

I then added inter-titles, manipulating the font so that there was a blue haze around it, to reference back to Avatar the movie, which the characters are made in an array of blue tones.

I tried to map out my teaser trailer before editing so that everything would be easily edited if i wanted to add effects or colour filters in certain parts.

I used the cross dissolve and fade to black in between each shot so that my teasr trailer would run smoothly and effectively, not straying from the Classic Hollywood Style of unobtrusive editing so the storyline is as easy to follow as possible and the audience is not distracted by harsh dramatic cuts from shot to shot.

I chose the simple text layer that faded in and out quickly, then changed the font to manipulate it into my own style.


I tried to make sure at all points of the trailer that timing was perfect, especially the start so that the audience were drawn in and intrigued to watch more rather than glance at it and not be interested.

Fading into the cloud effect gave reference to many production company's, the most famous examples being either Dreamworks or Warner Bros. Not a direct copy as such, but a mimic all the same.


I added a stylistic looking background onto my title to give it an illustration like look.

I made sure that the text layer was placed on top to show it fading in and out.

On certain parts of my trailer I changed the saturation levels so that I could make some shots a harsher contrast between light and dark tones, which would then impact the emotive effect of the trailer.


After some shots being exported from Photoshop and acting quite slow, it was easy to speed up the frame rate using final cut pro. I customized the speed to make it perfectly how I wanted it.

When exporting, I saved the video out as a master file and then uploaded it to youtube, as the MAC laptops would not allow to publish straight to YouTube as they are restricted by school guidlines.


Subscribe to:
Comments (Atom)