Showing posts with label Teaser Trailer. Show all posts

Friday, 12 February 2016

Planet Earth (full advert)


So I just came across this on Facebook. I couldn't not share it, it's almost like an advertisement to save Planet Earth itself. I found myself drawn into the video,  the powerful visuals were enticing, the music was emotive and full of feeling, with a clear point on what it was trying to portray. I only hope my movie teaser trailer is half as good as this empathetic piece.


Sunday, 31 January 2016

First Shot Animated

I published the first shot to YouTube so that you can see how it came together after constructing it.


First Shot Construction


So I started off on Photoshop by opening a new document, selecting film and video formatting and setting my background colour to a dark grey, almost black.


Then I opened window > Timeline and changed the frame rates per second from the automatic 30 (for live film) to 12 (for animation).


The next task was drawing a simple tree design, adding an image layer and a video layer. Once I had drawn the tree then on the unmovable image layer I realized I had made a mistake. I wanted the tree trunk and grass to stay in place but I wanted the leaves to move, the leaves that I had already drawn on the image layer...


So i made a new layer and redrew the tree over the top of the previous image layer as I needed to clean up the lines anyway.


This was the result I was left with when I hid the first layer. Almost identical but a little cleaner cut.


I then  went in frame by frame redrawing the leaves each time.


After I had about ten frames of the leaves moving, to work smart and not hard I duplicated the frames rather than redrawing them another coupe of hundred times, creating then a video layer group.


ttt

Thursday, 21 January 2016

Teaser Trailer Draft 2

Here is my second draft of my teaser trailer, I have added a few shots in but it still needs a lot of work in terms of build up and music.

Tuesday, 19 January 2016

Storyboard Planning

The Storyboard is a crucial element for me in the making of my teaser trailer as my film is animation so the storyboard will have to be visually pleasing and effectively intrigue people by the visuals, more so than the storyline. Today I was working on sketching out the opening scenes composition as I will have to work out every detail that is going into my film, as I am drawing it. Here is some of the sketches, featureing the establishing shout, with references to lighing, framing, mood and atmosphere throughout. (Apologies for the bad hand writing, couldnt get my ideas onto paper fast enough)


Monday, 18 January 2016

Teaser Trailer First Draft Construction

(follow up more detail from my last post)

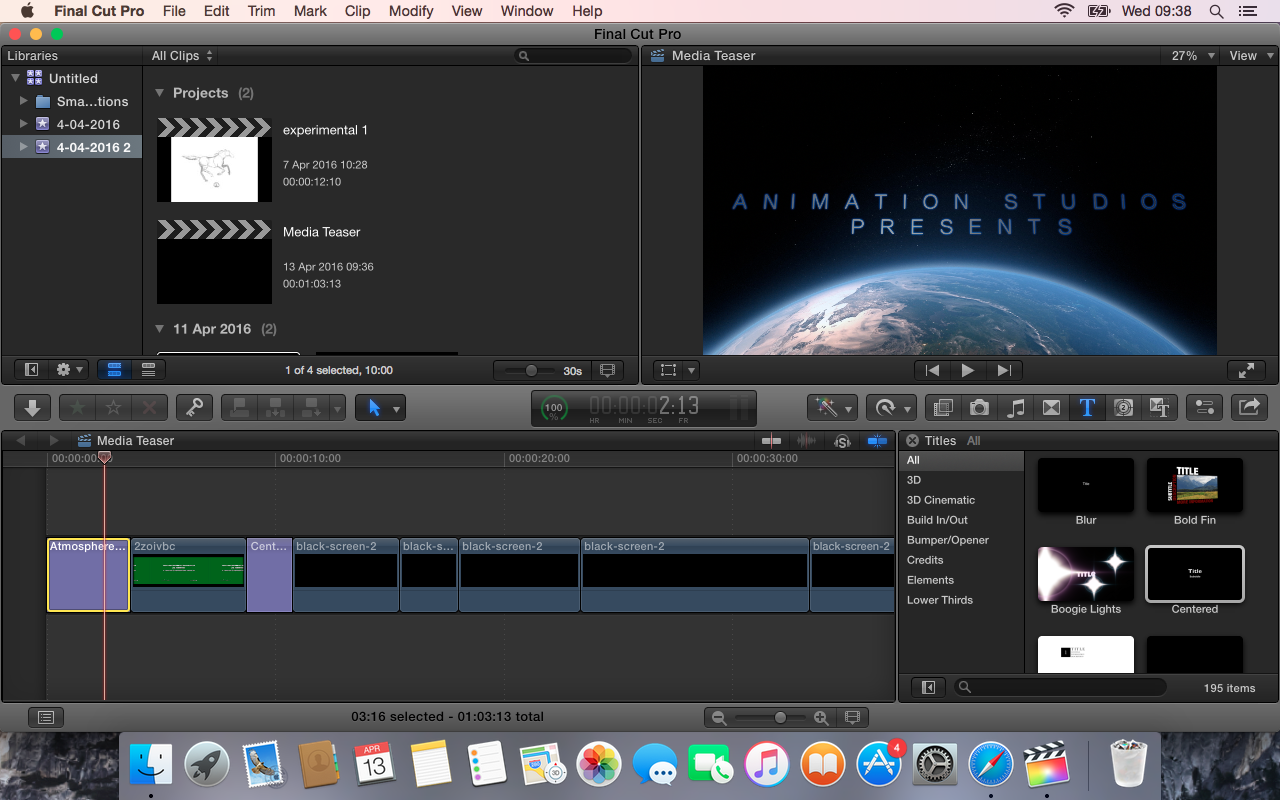
Here I have put into place the first draft of my teaser trailer using Final Cut Pro software available on the Mac Apple Laptops.

I started my trailer by opening on a shot of the production team, using a formatted effect of planet earth and the text swooping in, a lot like the UNIVERSAL film logo, making it easily recognizable to the audience as the company that produced it.


I knew that the trailer had to be timed perfectly, so I altered the time of each shot so that I could showw as much footage as possible without a lot of distractions, as my animation storyline is a bit harder to follow than your common genre.


I then added inter-titles, manipulating the font so that there was a blue haze around it, to reference back to Avatar the movie, which the characters are made in an array of blue tones.


I tried to map out my teaser trailer before editing so that everything would be easily edited if i wanted to add effects or colour filters in certain parts.


I used the cross dissolve and fade to black in between each shot so that my teasr trailer would run smoothly and effectively, not straying from the Classic Hollywood Style of unobtrusive editing so the storyline is as easy to  follow as possible and the audience is not distracted by harsh dramatic cuts from shot to shot.

 
I chose the simple text layer that faded in and out quickly, then changed the font to manipulate it into my own style.


I tried to make sure at all points of the trailer that timing was perfect, especially the start so that the audience were drawn in and intrigued to watch more rather than glance at it and not be interested.


Fading into the cloud effect gave reference to many production company's, the most famous examples being either Dreamworks or Warner Bros. Not a direct copy as such, but a mimic all the same.


I added a stylistic looking background onto my title to give it an illustration like look.

I made sure that the text layer was placed on top to show it fading in and out.

On certain parts of my trailer I changed the saturation levels so that I could make some shots a harsher contrast between light and dark tones, which would then impact the emotive effect of the trailer.


After some shots being exported from Photoshop and acting quite slow, it was easy to speed up the frame rate using final cut pro. I customized the speed to make it perfectly how I wanted it.


When exporting, I saved the video out as a master file and then uploaded it to youtube, as the MAC laptops would not allow to publish straight to YouTube as they are restricted by school guidlines.


Sunday, 17 January 2016

Teaser Trailer Construction

Here I have shown the processes used to create my teaser trailer. I started with opening final cut and inserting all of the essentials and work my shots in around these. I found a nice inter-title effect that had the earth in it, kind of reminded me of the universal studios production opening for movies so I decided to use it, as it would be recognised as a production company opening. I then called it Animation studios, as it fits in with the genre of fantasy animation.


I had to make sure that the timing was correct so I set up a timeline of a minute and worked back from that, inserting all the essential screens and inter titles first so that my structure was set up properly.


I edited in the inter titles using different fonts and manipulating the effects to fade in and out, making my work more effective and matching the emotive feeling I wanted the audience to feel, seeing as it is not aimed at children.


Saturday, 16 January 2016

Animation Construction on Photoshop CC 2015

Here I have replicated my previous presentation on Photoshop CS6 except this time I have taken you through the features and extras of the new version of Photoshop in regards to constructing an animation. There is also a video at the end which helped me a lot in regards to making movement, Youtube has been a huge inspiration for me to create an animation and solve all of my photoshop problems in the making!

Powered by emaze


Friday, 15 January 2016

Rotoscoping


In my teaser trailer I will be attempting to rotoscope images (draw over the top of them) to animate the live footage.
Rotoscoping is an animation technique in which animators trace over footage, frame by frame, for use in live-action and animated films. Originally, recorded live-action film images were projected onto a frosted glass panel and re-drawn by an animator. This projection equipment is called a rotoscope. Although this device was eventually replaced by computers, the process is still referred to as rotoscoping. In the visual effects industry, the term rotoscoping refers to the technique of manually creating a matte for an element on a live-action plate so it may be composited over another background.
A Scanner Darkly is a 2006 American adult animated science fiction thriller film directed by Richard Linklater based on the novel of the same name by Philip K. Dick. The film tells the story of identity and deception in a near-future dystopia constantly under intrusive high-technology police surveillance in the midst of a drug addiction epidemic. The film was shot digitally and then animated using interpolated rotoscope, an animation technique in which animators trace over the original footage frame by frame, for use in live-action and animated films, giving the finished result a distinctive animated look. It was distributed by Warner Independent Pictures and it was the first (and only so far) animated film released by Warner Independent Pictures.
The film was written and directed by Richard Linklater and stars Keanu Reeves, Robert Downey, Jr., Woody Harrelson and Winona Ryder. Steven Soderbergh and George Clooney are among the executive producers. A Scanner Darkly had a limited release in July 2006, and then a wider release later that month. The film was screened at the 2006 Cannes Film Festival[4] and the 2006 Seattle International Film Festival, and nominated for the Hugo Award for Best Dramatic Presentation, Long Form in 2007.

After principal photography was finished, the film was transferred to QuickTime for a 18-month animation process: interpolated rotoscoping. A Scanner Darkly was filmed digitally using the Panasonic AG-DVX100 and then animated with Rotoshop, a proprietary graphics editing program created by Bob Sabiston.

Rotoshop uses an animation technique called interpolated rotoscope, which was previously used in Linklater's film Waking Life. Linklater discussed the ideas and inspiration behind his use of rotoscoping in Ashraf's documentary, linking it to his personal experiences of lucid dreaming. Rotoscoping in traditional cel animation originally involved tracing over film frame-by-frame. This is similar in some respects to the rotoscope style of filmmaker Ralph Bakshi. Rotoshop animation makes use of vector keyframes and interpolates the in-between frames automatically.
The animation phase was a trying process for Linklater who said, "I know how to make a movie, but I don't really know how to handle the animation." He had gone the animation route because he felt that there was very little animation targeted for adults.
In my A2 Art coursework I attempted a still form of rotoscoping
for my final piece. I realised quickly with rotoscoping that the artists that create them really emphasise and exaggerate the features of the image, making them slightly goofier, more like a caricature than real life person, giving off the animated feel and adding a lot more detail and depth to the work.
To do this I imported the image to Photoshop and used my Graphics tablet to draw over the top. My teaser trailer will have elements of this in it but mainly it will be pure animation. The image on the left is the picture I took of my friend Lucy, the image below is the illustration I created of it, using rotoscoping techniques.


Tuesday, 12 January 2016

Teaser Trailer First Draft

Here is the first draft of my teaser trailer. I know that it is quite short but considering it takes far longer for me to gather footage my teaser trailer will be a tad shorter than standard time. Its only rough and early days yet but I am having fun working on it.


Sunday, 10 January 2016

How I am constructing my Teaser Trailer

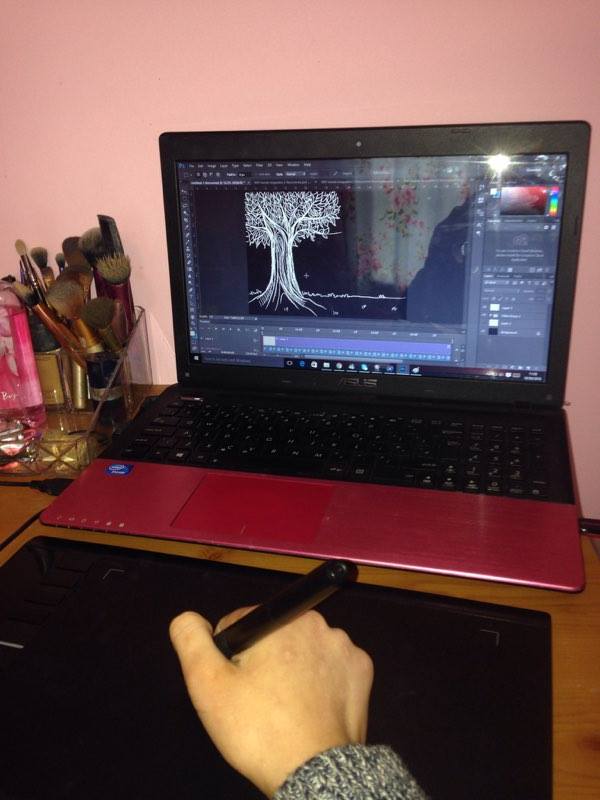
To make my footage for teaser trailer I will be using my Laptop, Ugee Graphics tablet and Photoshop CC 2015. Later then when I have the footage I will bring it into Final Cut Pro and edit it together into a teaser trailer format that suits my genre.

When plugged into my laptop using as USB cable, the tablet acts as a mouse with the pressure sensitive tip on the pen allowing to make thin and thick lines depending on how much pressure is applied. This helps a lot meaning the pen is as close to a real pencil as possible whilst creating images and illustrations on photoshop.


The buttons at the side of my tablet allows me to use shortcut keys, such as quickly flicking backwards and forwards through frames, undoing, erasing and rendering. Making work easier and faster to complete.